
Remember me
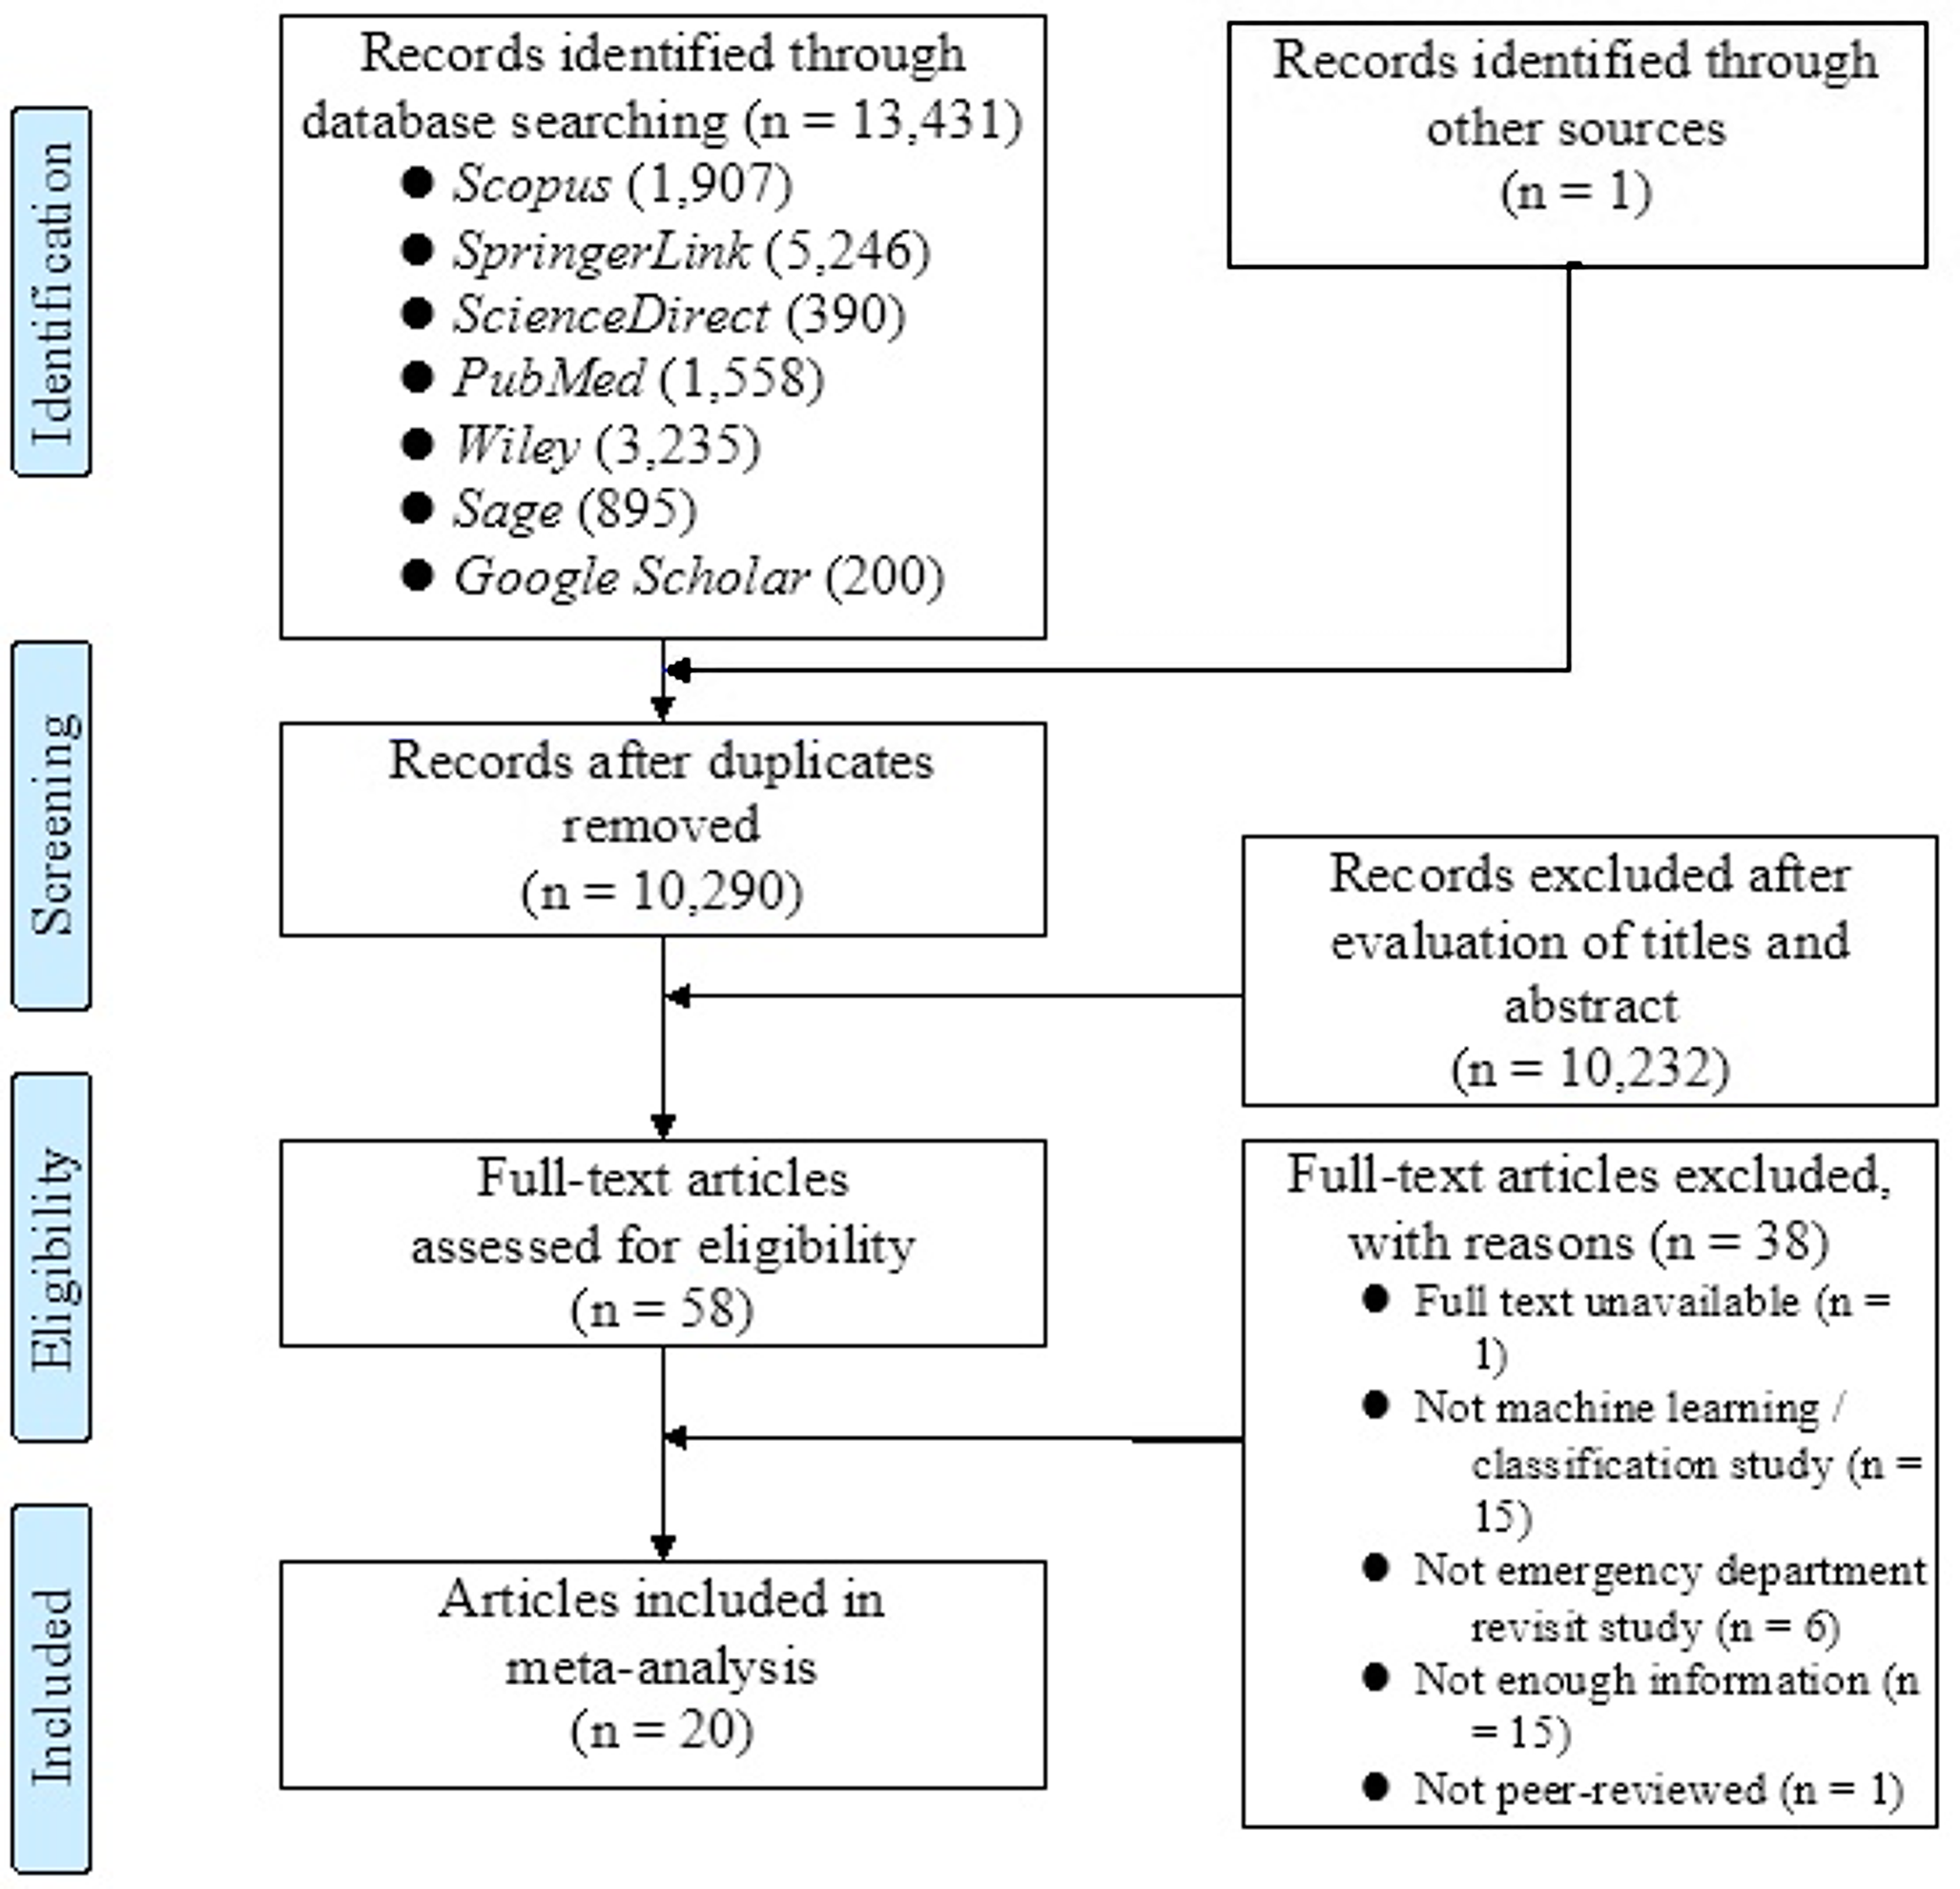

In compliance with the project concept, a medical team consisting of 11 board certified pathologists with prostatic pathology subspeciality competences working independently in 4 different medical centres was organized aiming to create prostatic adenocarcinoma annotations on anonymized whole slide images (WSI) of prostate core biopsy specimens by means of a widely used, open-source annotation platform (Cytomine, Liege, Belgium). Our study design aimed therefore to emphasize human quality diagnostic work, generally a bottleneck in similar studies [13, 17, 21]. Cooperation of the 4 medical centres and the project management as well as the project concept had previously been consented by local bioethical authorities. A pool of altogether 2,340 WSI was created by the medical team via initial computer searching in the archives of the 4 participating medical centres for prostatic core biopsy cases previously diagnosed as cancer positive (1 biopsy per patient. Hematoxylin and eosin (HE stained glass slide specimens of each archived case were quality controlled as well for slide physical properties as for cancer diagnosis, then scanned at 20 × magnification by appropriate slide scanner machines (1 WSI per case,3DHistech, Budapest, Hungary. WSI-s were anonymously uploaded to our project dedicated server wherefrom the Cytomine annotation platform could be operated to grant access for each medical team member to personally dedicated and password-protected cases. An initial pixel-level annotation round of all cases was based on a previously agreed set of 49 annotation terms, similar to that described by others [2] This was in the long run further focused to a subset of 10 terms that finally proved to be both medically relevant and prevalent enough to constitute the medical data package worth of transferring for IT-processing (Table 1). The WSI population was split into a training data set (1,904 WSI) and a hold-out data set (436 WSI), and on both data set the medical team developed annotations for AI model training and then subsequently for model performance testing. To ensure that the annotations in the validation set were accurate (acting as the source of truth), each annotation in the validation set had been reviewed by a second medical team member. If first- and second-look opinions proved to be in agreement, consensus was declared and annotation judgement was accepted, whereas upon disagreement, a third reviewer’s decision had been sought. In case the three experts had got to three different results, the annotation was excluded for lack of consensus.
Table 1 Focused List of Annotation TermsPatch GenerationExperts drew polygons, using Cytomine (https://cytomine.com/) outlining each of the 10 tissue types present in the WSI. For each of the polygons, using an in-house developed software program we created a bounding box and cropped and saved that region as independent image. Images were saved in.png format and no compression was applied while saving. For simplicity we will call these images as region of interests (ROIs). From each ROI we created about Zi (\(_\in \text\)) number of 256 × 256 patches by cropping. Here, Zi is the integer equivalent of\(_=\frac__}\times __}}\), where \(__}\) and \(__}\) are respectively the width and height of the ROI in consideration. When 0.5 ≤ \(_<1\), we created a patch of size 256 × 256 by padding required number of pixels. The color values of the padded pixels were set to (240, 240, 240), which is the mean intensity of the background, determined experimentally. When \(_<0.5\) the associated ROI has been ignored and no patch was generated out of this ROI. Each of the generated patches were independently checked whether it was truly tissue or not. Figure 1 shows a particular example where ROI had non-tissue regions inside and which was big enough (i.e.,\(\ge 256\times 256\)) to be independently considered as a patch.
Fig. 1
a An example ROI at 10 × magnification level that has big enough non-tissue regions to be independently considered as a patch. b an example non-tissue patch generated by cropping the ROI shown in a
To ensure fair training of the CNNs in this work, in line with other works in the literature, we decided to use a similar number of patches for each of the 10 terms, and thus adjusted Zi accordingly.
Patches were generated independently for each of the magnification levels—5x, 10x and 20x, however, the patch size for each of the magnification level were kept same, and this had been inspired by the work of [2]. Likewise, we adopted the [2] patch size as \(256\times 256\). Table 2 details the number of patches used for training and validation of the CNNs.
Table 2 Total number of patches in each term and magnification levelWe randomly split the dataset into—training set (90%) and—validation set (10%). An additional independent test set of size approximately 19% of the full data was used for the final testing of classification performance.
Proposed SystemThe system analyses the whole slide image (WSI) in three consecutive steps that include tissue detection, classification, and slide level analysis. Given WSI as input the system first divides the image into multiple patches of size 256 × 256. This process is called tiling. A supervised method [25] that relies on traditional rule-base machine learning (Jimenez-del-Toro et al. 2017) has been developed to identify tissue and non-tissue (or background) patches. Deep convolutional neural networks (CNNs) [26] have been trained to classify each tissue patch into 10 predefined classes (Table 1). These classes were chosen based on their clinical significance in prostate biopsies and/or their distinct morphologic appearances. Transfer learning [27] has been used in training the CNNs. From the list of CNNs that were available for further development and training we choose to experiment with Inception-v3 [28], ResNet50 [29] and VGG16 [27], who are widely used and best performing CNNs in several computer vision tasks. Ten heatmaps have been generated by feeding all of the tissue patches generated from a WSI to the CNN, where each heatmap represents the probabilities of one class along the entire slide. From the heatmaps a set of scores per slide that quantify the likelihood of cancer has been computed. Figure 2 shows the overall process of the proposed system.
Fig. 2
The process of classifying a whole slide image (WSI) with the proposed system. The input WSI is first divided into square patches of predefined sizes. These patches then sequentially pass-through rule-based machine learning and deep learning-based methods and are classified
The system was implemented in Python, version: 3.8.12 (http://www.python.org). Keras, version: 2.4.3(https://keras.io/) with Tensorflow, version: tensorflow-gpu-2.3.0 (https://www.tensorflow.org/), was used for the development of the CNN. Openslide, version: openslide-python-1.1.2 (https://openslide.org/) was used to read WSI.
The training, validation and testing was performed on a Dell Precision 5820 Tower Workstation, which had an Intel Xeon 3.60 GHz CPU installed. The workstation was equipped with 64 GB RAM, and an NVIDIA GeForce RTX 2080Ti GPU (Dell Inc., Round Rock, TX, USA).
Tissue DetectionThe tissue detection step runs on a patch of size 256 × 256 and classifies each patch as tissue or non-tissue (or background). For each of the patch a 24-dimensional(D) feature vector is computed to describe the patch. Statistical measures that include mean, standard deviation, variance, median, minimum, maximum, range, and mode [30] computed independently on each of the red, green and blue channels of the patch are computed and finally combined to form the 24-D feature vector that described the patch. A random forest (RF) classifier [31] has been trained to perform the background and tissue classification based on the feature descriptor.
While implementing the RF classifier we experimented on a list of parameters and thus ensured the classifier is optimally trained in the context. The parameters we experimented on include – the number of trees in the forest (‘n_estimators’) [32], which function to use as criterion to measure the quality of a split (‘criterion’) [33], when to stop expanding the leaves (‘max_depth’), the minimum number of samples required to be at a leaf node (‘bootstrap’) [33], and how to setup the “bootstrap” parameter [32]. We found the setup—‘n_estimators’ = 100, ‘criterion’ = ‘entropy’, ‘max_depth’ = None and, ‘bootstrap’ = True, works best in the context. More specifically, We experimented with the following set combination of hyperparameters while training the RF classifier: ‘n_estimators’: [50, 100, 200], ‘criterion’: ['gini', 'entropy'], ‘max_depth’: [None, 10, 20, 30], and ‘bootstrap’: [True, False]. To systematically evaluate all possible combinations of these hyperparameters, we utilized the GridSearchCV object in scikit-learn [33]. This tool performs an exhaustive search over the specified parameter values using cross-validation. After evaluating all combinations, the ‘grid_search.best_params_’ attribute stores the combination of hyperparameters that achieved the highest score according to the specified scoring metric (i.e., accuracy).
A total of 15,034 patches randomly chosen from 50 whole slide images were extracted and labelled as ‘tissue’ or ‘background’ for training and validation of the classifier. The number of patches on each category were exactly half of the total number of patches. A set of 2,255 fat-tissue patches were explicitly included in the ‘tissue’ set. This was to ensure the sensitivity of the RF classifier is high enough to detect fat tissue that may be repeatedly present at the periphery of tissue specimens. It is worth mentioning that ‘fat-tissue’ gives a very whitish hue that may easily be taken for background whiteness. Figure 3 shows some sample fat-tissue patches along with other tissue patches.
Fig. 3
Sample (a) fat-tissue and (b) other tissue patches used to train the RF classifier
Tissue Classification Pre-Processing and Data AugmentationThe patches were pre-processed to transform them into an appropriate input specific to the model. More specifically, patches were first converted from RGB (R = Red, G = Green, B = Blue) to BGR, then each color channel was zero-centered with respect to the ImageNet dataset [34], without scaling. The ‘preprocess_input()’ function specific to VGG16 and readily available in Keras was used for that purpose.
Data augmentation was also performed prior to training the CNNs. Data augmentation is a common practise to train deep learning models because it generates new training data that helps to prevent over fitting and increases the generalizability of the model [35]. For the data augmentation we used the Keras ‘ImageDataGenerator()’ function which generates a continuous stream flow of data to the model for the training phase, with options for all commonly used image augmentation techniques. In this work we used rotation between 0 and 360 degrees, shear in the range 10%, zoom-in and zoom-out by 10%, width shift range 10%, height shift range 10%, and horizontal flipping.
Training the CNNInspired by the work of [2], in this work we decided to experiment on 3 different magnification levels (i.e., 5x, 10x, 20x). However, in different to Pantanowitz et al. rather than ensembling them directly in this work we critically analyze their respective performance. Each of the CNNs are independently trained using WSI patches of 3 different magnification levels. We experimentally found (details in Appendix) VGG16 was performing at least as good as the other CNNs, specifically Inception-v3 and ResNet50 in the context, and thus we decided to persist with VGG16 throughout the study. VGG16 is simple, yet one of the best performing and most frequently used CNNs [36]. Since our target outputs (i.e., number of classes) are different than the ones from the original model, to adapt the model in our context we removed the top layer of the CNN and added a global average pooling 2D layers and finally a dense layer with 10 outputs. Softmax activation was used. Glorot uniform initializer, also known as Xavier uniform initializer [37], was used to initialize the weights of the newly added layers.
We initialized the parameters of the model using transfer learning [38]. More specifically, we used pre-trained weights downloadable from (VGG16_weights), to initialize the model parameters. These pre-trained weights were originally computed by training VGG16 on ImageNet dataset [34], which is one of biggest classification datasets till date [39]. Once initialized, we then fine-tuned the weights using our dataset. It is worth mentioning, initialization with pre-trained weights over random weights ensures fast network training with less epochs, avoids over fitting and ensures robust performance [35]. It is a promising alternative to full training and is a common practise nowadays [38]. ‘Stochastic gradient descent (SGD)’ [40] optimizer was used with learning rate 0.0001 and momentum 0.9. ‘Categorical Cross Entropy’ was used as the loss function. To train the model, we firstly trained the newly added layers for 20 epochs and then trained the entire model for another 200 epochs.
Slide Level AnalysisEntire slide level information is generated by aggregating all the patch level information and mapping it back to original slide level. A total of 10 heatmaps are generated by considering the patch-wise probability of each of the 10 predefined terms. Thus, each heatmap represents the probabilities of one class along the entire slide. Figures 4 and 5 show some example heatmaps generated by the system.
Fig. 4
Sample heatmap produced by the system
Fig. 5
Another presentation of the heatmap produced by the system
Each of the heatmaps is independently used to compute ‘area size’ (in sq.mm) and ‘relative area distribution’. To compute these values a threshold \(_\) is applied to the heatmap in consideration.\(_\),_|h\in 1:10\}\) is a user defined input (default: 0.5). Probabilities that are greater than or equal to \(_\) are set to 1 and rest are set to 0. A value\(_\), which is summation of all the ‘1’s in heatmap h, is computed for each of the 10 heatmaps. To compute the ‘area size’ in sq. mm, \(_\) is multiplied by the corresponding ‘x_resolution’ and ‘y_resolution’ that comes with the WSI file (e.g.,.ini). To compute the ‘relative area distribution’ \(_\) is divided by the total tissue present in the WSI. Figure 6 shows a snapshot of the basic area data computed from the heatmaps.
Fig. 6
From the basic area data more specific Gleason scoring data is computed (Fig. 7).
Fig. 7
The system provides user the option to choose which model to run – 1) 5x, 2) 10x, 3) 20x or 4) combined, while performing cancer assessment. While combined option is chosen – 1) the strides of the three models are automatically adjusted in a way such that they will produce heatmaps of the same size, 2) the heatmaps produced by 5x, 10x and 20x are aggregated by taking the weighted average (specified by the user, default 1/3) of them.
Evaluation MetricThe commonly used measures of evaluation that include sensitivity, specificity, accuracy, and area under the receiver operating characteristics curve (AUC) have been used throughout this study to analyse the performance of the system [41]. Sensitivity, specificity, and accuracy are mathematically defined as follows:
Here TP, TN, FP, and FN represent true positive, true negative, false positive and false negative respectively. In the receiver operating characteristics curve (ROC), the sensitivity (also called true positive rate) is plotted against the false positive rate (i.e., 1-specificity) for different cut-off points of a parameter and the area under the ROC curve is then computed.
Comments (0)